Showing posts with label applique. Show all posts

Tuesday, 16 May 2017

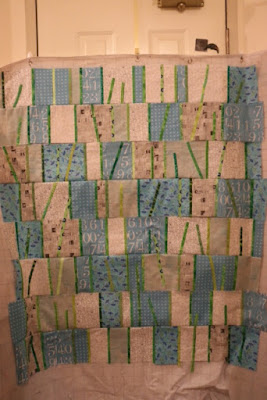
Tulip Quilt in progress.

I decided to make my blocks larger and in a combination of low volume black and whites along with blue and white fabrics.  Here are the blocks laid out on my design wall.  This is from the latest Quiltmania magazine and is on the cover .
 Then I added stems which will be stitched between the blocks.
 I then started laying additional stems that will be appliqued down. Some stems will cross over two block heights. At this point I had 7 rows.
 I put up a few flowers and leaves to see how it was looking. The leaves are my design not included in the magazine.
 I decided I wanted one more row to make it 8 and also made it wider. The rows have been sewn into pairs so some of the stems will extend over the seam lines.
 Playing with tulip placements and a few leaves.
 Adding some more leaves.
 The top two rows are finished I think...you never know.  They are not the same length so I can play with how the sewn in stems will stagger down the length.
 A closer view of the tulips from left...
 Centre...the top one will be partially sewn into the binding.
and the right side.
 Now to start on rows 3 and 4.  I'm loving how this is coming together.

Tuesday, 25 April 2017

Surprise on the River. I love Tulips and Spring flowers!

Came home after running some errands this morning and spotted this thru my window.
 I decided to go outside and take a closer look.  It looks like a fishing boat ran aground.  The river is tidal all the way up to Mission and I'm thinking that these guys weren't aware and moored overnight.  You can see another smaller boat to it's right side.
 A slightly different angle and you can see more of the sandy bottom being covered by the tide coming in.
 There are two guys sitting with their backs along the left side appearing to be talking with someone on the other boat.

 It looks like they will be heading off soon.  In fact I just checked and they appear to have been able to get under way and sail off.
 Love the look of these tulips fully opened.
 Grape Hyacinth under the roses.
 Pincushion daisies showing off.
 Pink tulips about to burst forth.
 Love the tie dye look to this one.
 Forget Me Not under an azalea.
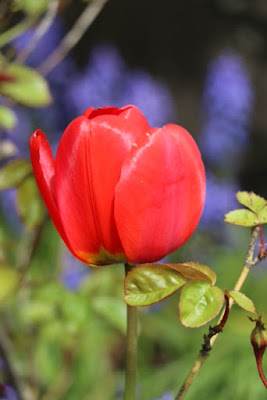
 Rogue red tulip amongst the grape hyacinth and roses.
 A bit farther look at that tulip.
 Wall flowers in bloom.
 Love this colour combination.
 These were planted at the front of our condo last fall.
 Hmm,,,remind you of anything?  Working on my leaves and still have two more sizes of tulips to finish before I can start sewing the background and then the fun part.
By the way, it looks like we are heading towards another rainfall record for April!

Tuesday, 18 April 2017

Inspiration and Interpretation.

The tulips are blooming along the quay finally.
 Some are still in bud.
 This beauty was in Rita's Garden.
 Along with this one.
 Love this one amongst the Forget Me Knots.
 Love these pink ones.
 Interesting how many reflect the ones I'm prepping for a quilt.
 I've picked out 19 different yellows, pinks and purples.
 There are five different sizes
 If I pick one more colour it will make 100 blooms.
 Next up is choosing backgrounds, stems and leaves.
 View from the lobby this afternoon, the blossoms are dropping from the cherry trees.  It rained this morning and the skies are starting to clear.  Soon the leaves with replace the blossoms.
Back to prepping more tulips.

Tuesday, 4 April 2017

Down the Rabbit Hole, leaf tutorial and some Spring Flowers.

The next step in making Down The Rabbit Hole is adding 51 leaves!  I don't do needle turned applique my preferred method is to use freezer paper and starch.  Rather than cut 51 freezer paper leaves I decided to use some heat resistant Mylar and see how it worked out.  First I traced in pencil on the wrong side the shape of the finished leaf and cut them out with a generous seam allowance.  I decided to run a basting thread around the curve of the leaf.
 I made myself four of the Mylar template to aide in production.

 This is a batik so I had a large knot on the right side and ended on the right side to make it easier when I went to remove the thread.
 I placed the template on the leaf and drew it up fairly tight.
 I pressed the bottom and the ironed the top tip over.  I then used a paint brush and liquid starch and ironed it down.
 I ironed the left side then painted with starch and ironed again.
 Same for the right size.
 Then before I removed the template I eased out the thread and I then trimmed the seam allowance down to closer to an 1/8" and slipped the template out from the bottom to help maintain the nice point on the leaf.
 On this one the seam allowance hasn't been trimmed yet but after I remove the template I do another pressing.
 Nice points and sharp edges.
 My pile grew of finished leaves.
 Here is how much they shrink after turning the edges.

Here are the first ones that I placed around the centre.
 Here are the second group of over cut.  I may use them all or not.

I placed all the leaves that I cut before starting to turn the edges on my design wall.  I over cut the leaves and I think there are about 56 leaves with about another thirty that I cut.  I decided to turn all the leaves as I like the look of the bigger leaves and want to create that volume illusion with the turned leaves.
 Speaking of flowers and leaves.  Here is a better shot of the Magnolia tree I shared the other day.
 We did have some rain and wind overnight on Saturday so the blooms are starting to look a bit beat up.
 The sky was so blue on Sunday with hardly any clouds in the sky.
 I love the contrast of the pink against the blue sky.
 A bud just about ready to open up!

We have some lovely heritage homes in New Westminster and I was parked in front of this side by side duplex.  This side still had the original stained glass windows on the main and upper floor.
 They also have two gargoyles on guard of the stairs leading up to the front doors.
Time to start placing those leaves and to start stitching them down.